By Ahmed Hajouj.
Called the “herb of happiness,” Origanum majorana, commonly known as sweet marjoram or knotted marjoram, is an herbal symbol of peace and well-being. Marjoram is grown as an annual in the colder parts of the world but is perennial in warmer regions. To keep it growing as a perennial, bring it indoors for the winter. Marjoram may be grown as a houseplant and as it has a tendency to trail when grown indoors, it makes a nice hanging basket. Marjoram has small, grey-green, oval-shaped leaves that are velvety to the touch. Tiny white or pink flowers, reddish stems, and the grey-green colour of the leaves make marjoram an attractive border plant.
Marjoram grows 10 – 24 inches (25 – 60 cm) tall. Cultivation requirements: does best in full sun (will tolerate slight shade); well-drained soil; no fertiliser; water soil sparingly but do not let dry out; pinch back the tips or harvest sprigs to use in cooking to keep it bushy and productive.
Marjoram is easily grown from seed or cuttings. For spring planting, start seed indoors 6 – 8 weeks before your last frost date. Keep the soil moist during germination. After germination, move the seedlings into a sunny position, and transplant into the garden after all danger of frost has passed. If you are bringing marjoram plants in-doors for over-wintering, pot up in fresh potting soil. Check for critters and if your plants are infected, spray with a soap and water spray.
Marjoram requires at least 5 hours of sunlight a day. If you are growing marjoram on a windowsill, turn frequently to ensure all sides receive light. Marjoram can be grown under fluorescent lights. Hang the lights 6 inches (15 cm) from the plants and leave on for 14 hours a day.
In the garden, marjoram entices bees and butterflies for maximum nectar production and pollination. It is a good companion plant for all vegetables especially beets, eggplant, pumpkin, onions, and zucchini as it aids in their growth and fights off insects. Grow marjoram in pots in the garden as well as in the soil. In the kitchen, use in tomato dishes, onions, dairy, eggs, potato salad, soups, mushrooms, brussel sprouts, oil dressings for salads, carrots, and cauliflower. Fresh leaves and young shoots can be added to salads. It is a major ingredient, usually dried, in sausages, poultry seasonings, Italian recipes, or stuffings. Sprinkle fresh or dried marjoram on pizza. Sprinkle finely chopped fresh leaves on meat or fish before roasting, grilling, or baking. A tea can be made with marjoram to treat colds, headaches, and stomach upsets. Add 3 teaspoons (15 mL) fresh marjoram to 1 cup (250 mL) boiling water. Let steep, then drink slowly. Use marjoram sparingly as it is deceptively potent. Add during the last 10 minutes of cooking.
Marjoram will keep several days in the refrigerator. The leaves can be harvested as soon as the plant starts blooming. The leaves dry easily and can also be frozen. Many cooks prefer marjoram rather than oregano (closely related), as marjoram is much less pungent. To make potpourri, dry leaves whole and then crush to release the scent.
I have been known to rant on about how people should try to include more native plants within their garden. However, I would never dissuade someone from including a Japanese maple within his or her garden; on the contrary, I would heartily recommend it.
History and colour
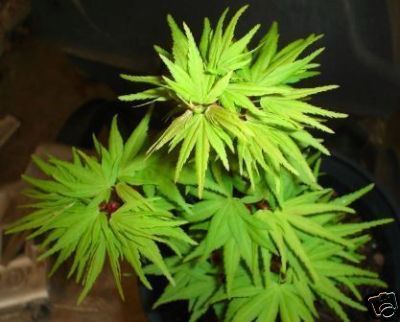
The image of a Japanese maple in full leaf brings to my mind images of oriental calmness, still water and moss covered mountains. This elegant plant is a distinct part of the culture and consciousness of its native Japan through its use in both horticulture and art. In the year 1800, over 200 varieties of this plant were noted in Japan, this figure grew over the next 100 years, only to have those numbers knocked back again to 200 by the maelstrom of the second world war. Japanese maples also known as Acer palmatum or Acer japonicum are diminutive in stature compared to other trees. Heights range from 1 metre to 7 metres, leading many gardeners to class them as large shrubs rather than small trees. Words cannot do justice to the colour displayed by a Japanese maple; it must be seen to be believed. An Acer owner will experience fiery new spring growth, calm summer foliage and even fierier autumn chilled leaves.
Palmate or Dissectum
There are two main groups of Japanese maple. The “Palmate” group has a reasonably upright growth habit with layered branches and leaves that are made up of five to nine lobes. The “Dissectum” group rightly lives up to its name with its lobed leaves dissected, feathered and lace-like. I feel that the maples in the “Dissectum” group look particularly well if planted close by an informal water feature due mainly to their weeping, cascading form.
How to grow a dwarf acer
Japanese maples do well if planted in an east facing aspect, allowing it access to the morning sun and protecting it from the mid-day sun. Shelter from winds and a moist but free draining soil are also important cultivation requirements. A 7cm layer of bark mulch applied to the plants base will help prevent the plant drying out. To enable good growth you must feed your little piece of the orient, apply a liquid fertiliser in mid-spring and again in mid-summer at half strength. As these Acers are shallow rooted, they are ideal for planting amongst other shrubs with no check to growth. For a delightful oriental scene, try planting Acer palmatum with rhododendrons, azalea, bamboo and birch.
Specimens for container growing
Two beautiful specimen maples whose leaves are opening out within garden centres now are “Orange Dream” and “Beni-Maiko”. “Orange Dream” is worth mentioning due to its fresh yellow/green lobed leaves. The young growing tips have an orange glow, providing an attractive contrast. “Beni-Maiko” on the other hand produces lovely pink foliage in spring turning to dark red in summer. Both of these Acers grow to around 1 metre tall, an ideal size for container growing. If you choose to grow a Japanese maple in a container, try to select one that is sympathetic to the plants heritage, a glazed oriental style pot would be ideal.
 By Ahmed Hajouj.
Known as common garden chives, Allium schoenoprasum, can be grown indoors and out. Chives are rich in vitamins A and C, potassium, and calcium. They are grown for the flavour of their leaves, which is reminiscent of onion, although much milder. Both the stems and light purple flowers are used in cooking and the snipped leaves are an addition to many dishes. Chives lose their flavour with long cooking so it is best to add them to dishes at the last minute. For chopping stems, a pair of scissors is the best tool.
Chives can be frozen or dried. They are less flavourful when dried rather that frozen, so they are best used when fresh and snipped, or snipped and frozen. In both cases sort them carefully, removing any yellowing leaves and shoots, and keep only the plump green ones. It is possible to place chives in non-iodized salt, keep them there for several weeks, remove the leaves, and then bottle the ‘chive salt’ for use in flavouring.
Chives are a perennial in the garden and grow approximately 12 inches (30 cm) tall. They are extremely easy to grow, are drought tolerant, rarely suffer from disease or pest problems, and don’t require fertilizer. Cultivation requirements for growing chives: full sun, will tolerate light shade; grow best in well-drained, organic, fertile soil; keep soil moist – use mulch, and water during periods of drought. Chives tend to get overcrowded so dig and divide every three to four years.
Chives are easily grown from seed or can be brought indoors at the end of the growing season. If you are bringing chives indoors, divide a clump, and pot up in good houseplant soil. Leave your chive plant outdoors for a month or so after the first frost to provide a short period of dormancy. Bring them indoors and provide the requirements needed for them to start growing again. To harvest, snip leaves 2 inches (5cm) from the base of the plant. Cut flower stalks off at the soil line once they have finished blooming. This prevents the plant form forming seed and keeps it more productive.
Chives require at least five to eight hours of sunlight a day. Grow them on a southern or eastern exposure to the light. If you are growing them on a windowsill, turn regularly to ensure every side receives light. If you are unable to provide this amount of light, they also grow well under fluorescent lights. Hang lights 6 inches above the plants and leave lights on for 14 hours per day.
In the garden, plant chives with carrots. They are good companion plantings for tomatoes and fruit trees. Chives or garlic planted between rows of peas or lettuce control pashas and are reported to control the incidence of aphids when planted between roses. In the kitchen, use chives in omelets, scrambled eggs, casseroles, rice, dips, gravies, butter, meat, and seafood. Chives can be added to soft cheese, salads, sandwiches, sour cream, vinegar, and bake potatoes. Chive blossoms can be used for garnishing and are particularly attractive in salads. Chive stems can be used for tying up little bundles of vegetables for appetizers.
By Ahmed Hajouj.
Are you like me? Sad to see the summer end but at the same time relieved that there is one less task to tend to. Weeding, watering, pruning, and more weeding is over for this year and with a few more chores the outdoor gardening year draws to a close. Most of what needs to be completed is a matter of cleaning up and covering up. Practical steps to preparing your outdoor garden for winter involve:
1. Protecting plants. There are different opinions concerning whether to cut down or leave plants standing through the winter. Here on the prairies most people leave their perennials standing for a variety of reasons. In particular, trapping the snow cover is important for protection of plants and retaining moisture. Snow cover acts the same as good mulch by insulating the soil. Many perennial stems and seed heads are also very attractive for winter interest and provide food for the birds. After the ground freezes, mulch perennials and shrub beds with pine needles, compost, peat moss, or chopped leaves. This protects the soil and plant roots and moderates the effects of extreme temperature changes during winter periods of freezes and thaws.
2. Cleaning-up the garden. Harvest warm-season crops such as tomatoes even though they are still green. Lie out on windowsills; or layer in boxes with newspapers between the layers of tomatoes. They will slowly ripen or you can use green tomatoes for fried green tomatoes or various green tomato recipes. Pull out any remaining crops or spent annuals; clean up remaining debris and weeds to decrease the possibility of disease problems in the spring.
3. Evaluating your garden design. Before you start winterizing your garden, take a few minutes to review what worked and what didn’t and make note of any areas that you would like to change in the spring.
4. Prepare the soil for early spring seeding. Turn over the garden soil late in the season while amending with organic matter such as leaves, compost, or well-rotted manure. In the spring, a light raking is all that is needed.
5. Caring for trees and lawns. Protect the tender bark of young trees from rabbits and gnawing critters by wrapping stems or trunks with chicken wire or commercial tree-guard products. To prevent rodents from nesting near buildings and trees, trim tall grass, and remove weeds. Deeply water trees and shrubs so that they go into winter well hydrated. Don’t prune shrubs and trees as it may stimulate new growth just before the harsh weather. Cut lawns and fertilise if you wish with a low nitrogen ‘winter’ blend. Use grass clippings for mulch or compost. Never send them to the landfill, as they are excellent fertiliser left on the lawn (if they are not too long) and/or make terrific compost/mulch dug straight into the garden or used for pathways. Once rotted on garden pathways, dig into the garden and replace with new grass clippings.
6. Planting before winter. Now is the time to plant bulbs. Garden centres carry many varieties suitable for the prairies. Remember: buy good quality as cheap is not better – the larger the bulb – the larger the bloom. Look for plumpness, firmness, clean skin, and surface. Directions for planting are included with the package.
7. Composting. Compost dead plant debris including leaves. Leaves are a valuable natural resource. Rather than a nuisance, they are the best soil amendment as well as terrific mulches. Leaves take very little effort to recycle into a wonderful soil conditioner – leaf mould – for the yard and garden. You can make leaf mould by the same process nature does. Pile up moist leaves and wait for them to decompose or shred the leaves into smaller pieces before piling them up. If you wish, you can enclose the pile with chicken wire, snow fencing, or something similar. In the spring, I rake up dry leaves and dig them straight into the vegetable garden.
8. Cleaning your tools. Clean the soil from all your gardening tools, oil any wooden handles and moving parts, sharpen any blades, and then store them in a dry place for the winter.
9. Water Gardening. Bring in pumps, drain, clean, refill (if necessary) and store tender water plants prior to freezing.
10. Bringing in your indoor plants. Before bringing in any houseplants that have spent the summer outdoors, examine them for critters, wash them, and spray with soapy water or insecticidal soap. Use sterilised potting soil purchased from garden centres or shopping malls if re-potting your plants. Don’t use garden soil as it may harbour insects, weed seeds, disease, and fungi.